Time is a strange thing, it just keeps going. I last wrote in 2019! I promised myself that I would get back to it. I would take the TIME to write and put my thoughts, experiences, memories down where they wouldn't be lost.
0 Comments
2019... how is it possible that it is already 2019?! I swear I just wrote on this blog a few weeks ago. And I swear Mr. N has only been potty trained for a few days and that Miss L just outgrew her Belle princess dress last month. But, like so many warned me, the days were long but the years have been short. In a blink, my babies have become kids and my role has changed, transformed and grown. So, CHEERS to 2019 and figuring out what that all means!
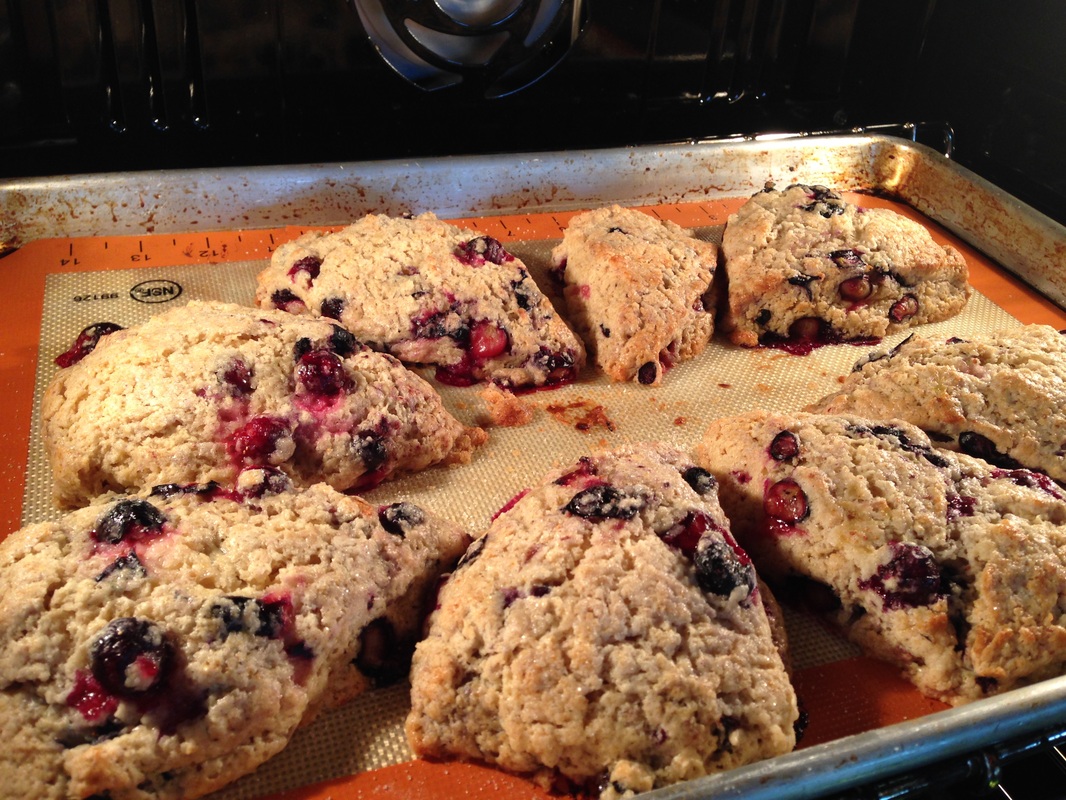
Every July the kids and I head down the road to our favorite local farm stand and pick blueberries. June is for strawberries and July is for blueberries around here! Which basically means that around this time every year, I start looking for new recipes and pulling out old ones to turn our beautiful fruit into delicious treats! This year was no exception. I have another blueberry scone recipe that I love, it uses greek yogurt and is super moist, more of a cross between a scone and a muffin. This year I stumbled upon this recipe and decided to give a new one a try. Where my other recipe is more "healthy" this recipe is all about the butter and heavy cream. These scones taste like the top of a blueberry muffin instead of the inside of a blueberry muffin. Maybe that only makes sense to me... but trust me when I say these scones will remind you of the top of a blueberry muffin with a light crunch but amazing flavor! They also come together quickly and require very little work! Go find yourself the best blueberries available, and make a batch today! They are worth it! Heavenly Blueberry Scone Recipe adapted from www.sallysbakingaddiction.com Yield 8 scones Ingredients:
Instructions: 1. Preheat oven to 400 degrees F Move baking rack to middle shelf. Line baking sheet with parchment paper or silicone liner and set aside. 2. In a large bowl, whisk flour, sugar, baking powder, cinnamon, and salt together. Grate the frozen butter (I used a box grater). Put the butter into the flour mixture and combine with a pastry cutter or couple of knives. Combine until the mixture resembles course meal. Set aside. 3. In a small bowl, whisk together the cream, egg and vanilla. Pour into the flour mixture and mix together until everything looks moist. DO NOT OVER MIX. 4. Gently mix in your blueberries. Try not to mash them, and do not over mix as much as possible. Over mixing will make the scones tough. 5. Work the dough into a ball and place on your baking sheet. Press it into a neat 8" disc. 6. Dip a knife into flour and use to cut the disc into 8 equal wedges. 7. Separate the scones so that their is room between each wedge. Sprinkle lightly with sugar (coarse sugar works as well). 8. Bake for 20-25 minutes or until lightly golden and cooked through. Remove from oven and allow to cool for a couple of minutes. Enjoy! 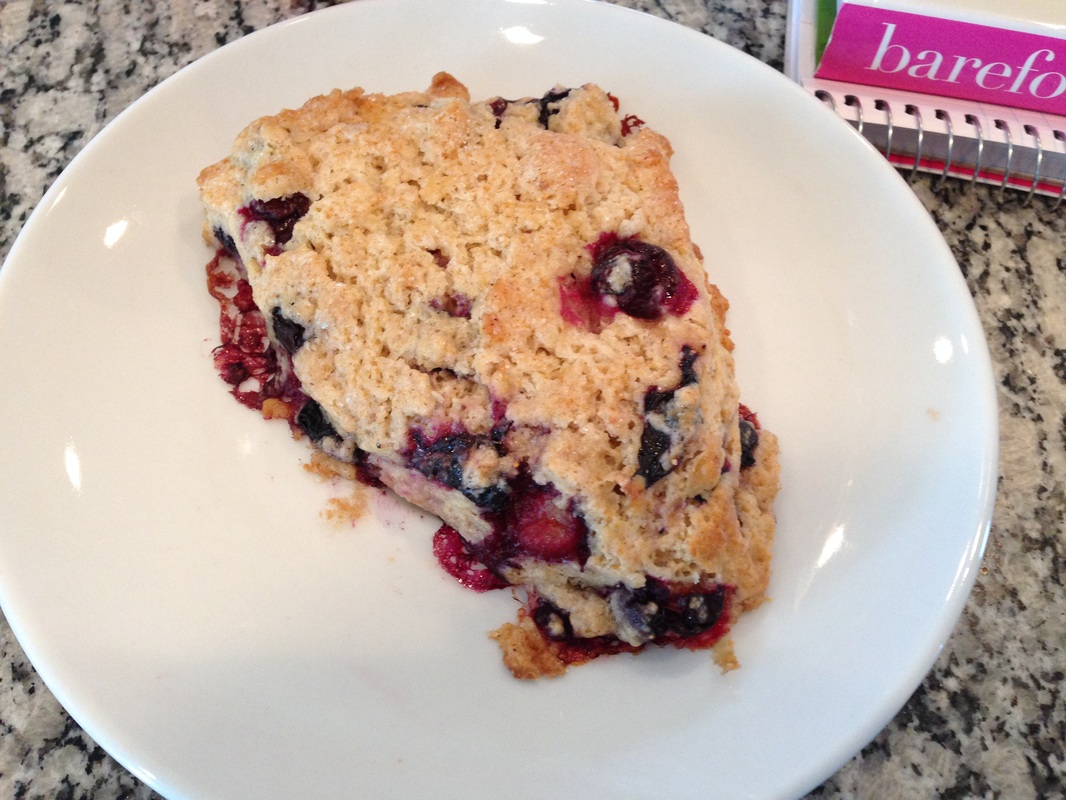
I love enjoying my scones with a cup of tea and a good book... something about it makes me feel sophisticated! Blueberry are my favorite, but I will rarely turn down a scone of any kind. What is your favorite flavor of scone?
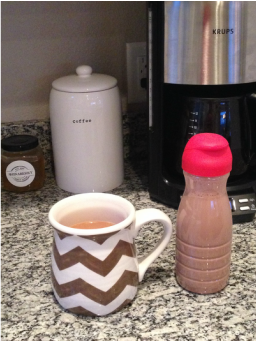 When the weather here in Ohio starts to get chilly, there are few things I love more than a warm coffee mug to wrap my hands around and warm up. While always trying to be conscious of leading a healthy example for my kiddos as well as making healthy choices for myself, I have recently been thinking about all the stuff that I put INTO my coffee to have it taste the way I like it. I am not a black coffee drinker. To be honest, I prefer my coffee to be more like a flavored hot chocolate! The more creamer the better is my general opinion. At least it WAS, until I started thinking about what was actually IN my creamer. I recently took time to read the back of my coffee creamer label and investigated the ingredients. NO CREAM! As a matter of fact, in bold letters it actually says "Contains: A MILK DERIVATIVE". What the heck is a milk derivative??? The first 3 ingredients are water, sugar, and vegetable oil... this just doesn't seem like a good idea to me! I am not looking to get into specifics of any kind on food ingredients or GMO's etc. I am not an expert and am certainly not trying to act like one, however, shouldn't creamer have cream in it? That just seems logical to me! So I now found myself in a dillemna. I LOVE MY FLAVORED COFFEE! What would the winter season be without peppermint mocha coffee? Boy was I excited when I stumbled upon this recipe. I found it at Deliciously Organic and knew I had to give it a try! Not only did she have a recipe for Peppermint Mocha, but a number of other flavors that sound delicious as well!  I stopped at the grocery store that afternoon after getting Miss L from school, to pick up a couple of items I didn't have on hand. One of them was pure maple syrup. This is something I have seen in MANY recipes that I have wanted to try, but to be honest, I have a hard time buying ingredients that I am afraid I won't like and then it will sit in my pantry. However, I decided it was time to bite the bullet and do it. I am SO glad I did! First, if you haven't ever tried it, you should! It is delicious (yes I licked the spoon) all by itself. It also added great sweetness without tasting like pancake syrup, which is what I was afraid of. I found this at my local Kroger in the organic foods section. I was happy to find this specific brand because it was the one that was recommended on Deliciously Organics website so I figured it was a good one to try and see if it was worth all the buzz I've heard. It was. That evening I whipped up a batch so that it would have time to cool overnight and I could give it a try in my morning coffee. I figured this was the best test to see how it compared to my usual creamer. I had an empty creamer bottle I had saved, so after making it I poured it in and put it in the fridge. I tasted the little bit that didn't fit in the container, and it was DELICIOUS! Before even trying it mixed with coffee, I was impressed with how quick it was to make, how few ingredients it required, and the fact that I could have drank it straight up! The next morning I was excited as I mixed it with my coffee. I noticed a few things. 1. I needed to shake the creamer before I added it to my coffee. I could see that much of the chocolate had sunk to the bottom, think about if you make a glass of chocolate milk and leave it sit, after a while it separates, but all you need to do is stir it back up. 2. While my coffee looked creamier, it didn't look like a whole new substance, it still looked like coffee, just a lighter color. 3. As it cools, it continues to separate. I don't know if you are like me, but I nurse a cup of coffee for a long time. One cup can last me until lunch depending on the day. With that being said, after a bit I needed to grab a spoon and stir it up a little. Once I did it remixed and was just fine. Overall, I am a big fan. I consider this recipe a SUCCESS! Is it identical to my store bought creamer, no. But it is a close second. I have been drinking it in place of my other creamer for 3 days now, and I have to say, it does the trick! When I compare the flavor differences with the health benefits of knowing what I am drinking, it is a hands down easy choice. I plan to finish this flavor and then try another one. If you love creamer, but not peppermint mocha, head over to her site and take a look at some of her other flavor recipes! I love the fact that I know what is it in. I am drinking REAL ingredients, not derivatives! So... I won't make you wait any longer. Here is the recipe, originally found at Deliciously Organic! Homemade Peppermint Mocha Coffee Creamer For a sweeter creamer add more maple syrup. For a creamier texture swap more cream in place of some of the milk. 1 cup whole milk 1 cup heavy cream 4 tablespoons maple syrup 3 tablespoons cocoa powder 1 teaspoon peppermint extract Whisk together milk, cream, maple syrup, and cocoa in a medium saucepan over medium heat. When mixture begins to steam, remove from the heat and stir in the peppermint extract. Using a funnel, carefully pour into a bottle and store in the refrigerator. Creamer keeps for approximately 10 days in the refrigerator. I love cooking, but I get tired of having the same meals over and over again. I am guilty of falling into the rut of having the same rotation of meals that seem to cycle their way across our dinner table. I have cookbook pages marked with post it notes and pins separated and categorized into ingredients and meals. I have no shortage of inspiration for new recipes to try. I am sure I am not the only mom out there who goes to the store and inevitably comes home with bags filled with the same ingredients week after week. The problem is that I fail to plan and fail to prepare a grocery list that will provide me the ingredients needed for an entire week worth of meals. So this past week, I went back to trying to get organized on Sundays for the week ahead. I created a meal plan and planned two new dinners for the week outside of our "usual rotation". One of these was a WINNER! It really hit the spot for me, and the whole family. I have also been trying to get back on track with my portion control and healthy eating, and this recipe hit the target on all of the above! Bruschetta Chicken Recipe adapted from Commited to Getting Fit Bruschetta Topping Ingredients: 6 medium Roma tomatoes, seeded and chopped 1/4 cup finely chopped fresh basil leaves 1/2 tsp sea salt 3 cloves fresh garlic, minced 1 Tbsp balsamic vinegar 1/4 tsp black pepper 1 Tbsp olive oil Chicken Marinade Ingredients: 4 Boneless, Skinless Chicken Breasts 1 Tbsp chopped fresh oregano 1 Tbsp chopped fresh basil 1/2 tsp chopped fresh thyme 1 tsp chopped fresh Italian parsley 2 Tbsp lemon juice 2 Tbsp balsamic vinegar 1 Tbsp olive oil 1/2 tsp garlic powder 1/2 tsp black pepper 1/4 tsp sea salt Garnish: Goat Cheese Directions: For bruschetta topping, combine all ingredients and refrigerate for at least 1 hour. For chicken, combine all ingredients in a bag, shake to distribute and allow chicken to marinade for at least 1 hour. Grill chicken until it is no longer pink in the center, garnish with bruschetta topping and goat cheese. (If it isn't grilling season, bake chicken or use an indoor grill such as a Foreman Grill) I served ours with steamed broccoli and quinoa. I also gave the kids extra bruschetta and crunchy pita chips to eat like salsa. Next time I make it I will also make a loaf of french bread. The chicken would be excellent used as a chicken sandwich, or the bread would be excellent used to soak up any of the extra bruschetta juices. The leftovers were excellent the following day. PLEASE try this recipe, I promise it will not disappoint!
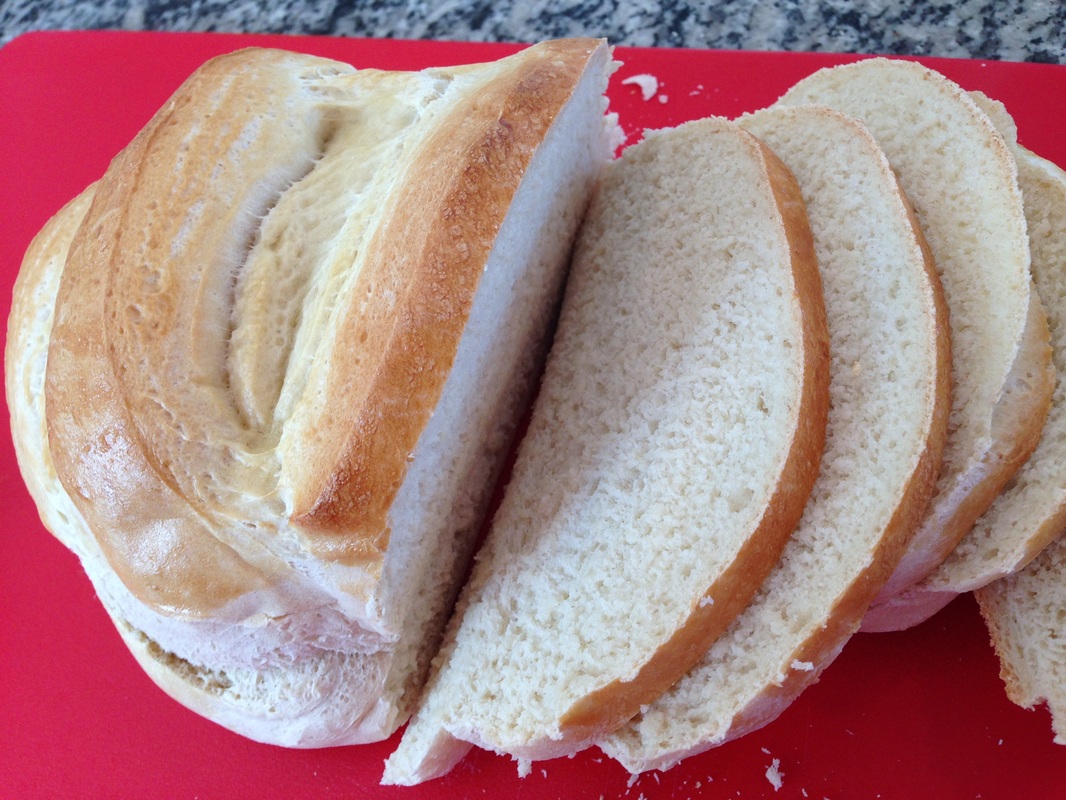
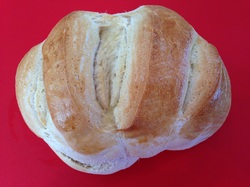 This recipe has become a favorite in my house! I love that it doesn't take hours to rise and in the middle of the afternoon when I decide what is for dinner I can throw it together and have it ready to go before my hubby gets home. It all gets thrown together quickly in my stand mixer fitted with my dough hook and in no time it is ready to form into loaves and pop in the oven. This recipe doesn't even require a loaf pan! It really is a simple, beginner friendly bread recipe. It makes 3 loaves which is great because it keeps well for a couple days and one batch can be spread over a couple of meals. Enjoy! 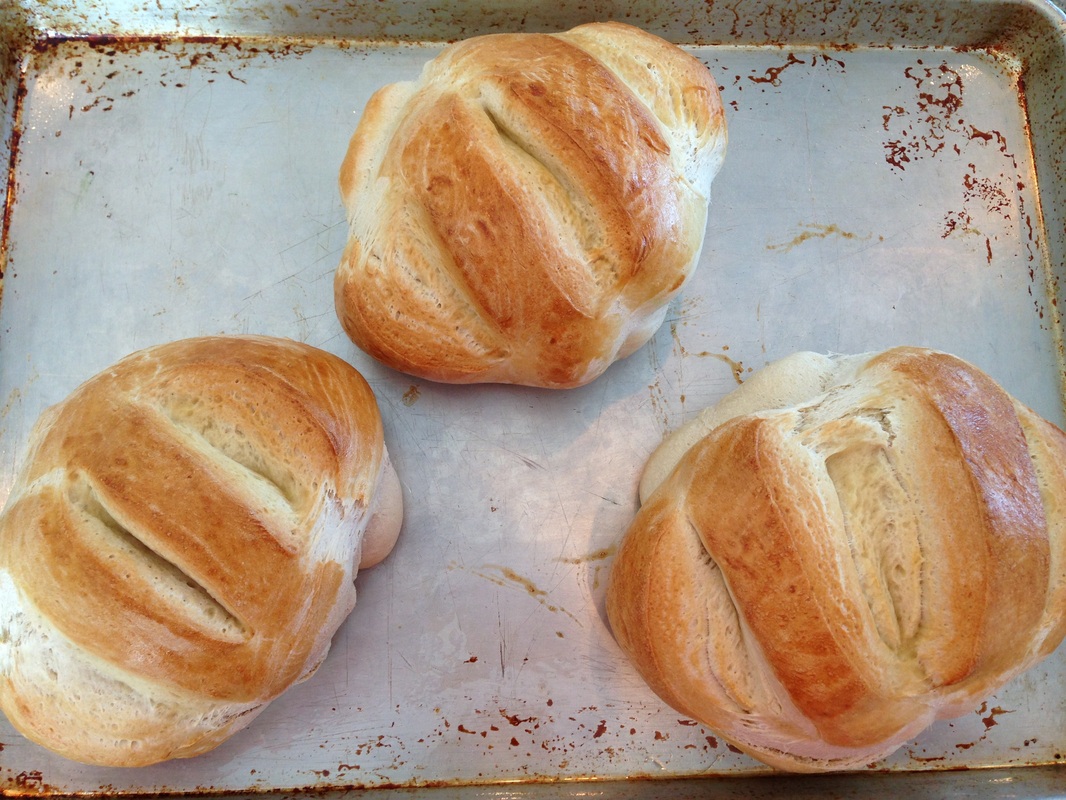
French Bread
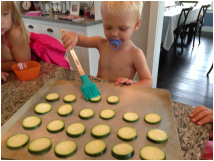
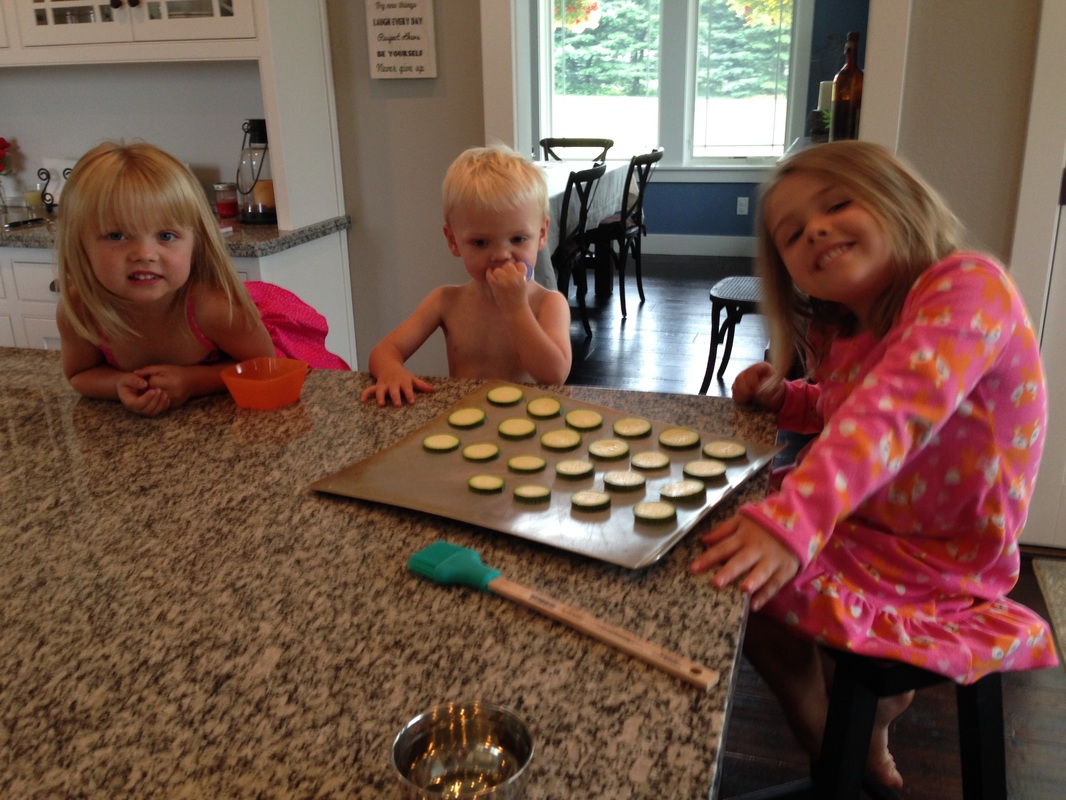
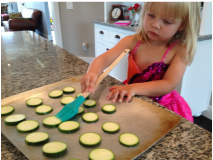
============================================================================================ 1 cup boiling water 1/3 cup warm water 1 Tablespoon Active Dry Yeast 2 Tablespoons Sugar 1 Tablespoon Salt 1 Tablespoon Shortening (I used butter-flavor Crisco) 1 cup Cold Water 5-6 cups All Purpose Flour 1 Egg Yields 3 Loaves ====================================================================================================== INSTRUCTIONS: Preheat oven to 170 degrees F. Fill a glass measuring cup with 1 cup of water. Place in microwave and heat for 3 minutes, or until water is boiling. Fill another measuring cup with 1/3 cup warm water. Sprinkle the 1 Tablespoon of yeast over the water. With a fork, stir yeast into the water until yeast is completely dissolved. Pour the sugar, salt and shortening into the bowl of your stand mixer, fitted with the dough hook. Using a fork, mash these ingredients together(this will help the shortening melt when the hot water is added). Pour the 1 cup of boiling water over the shortening mixture in the stand mixer. Add the 1 cup of cold water into the mixer. Then pour in the yeast/water mixture. Add 3 cups of flour into the mixer, and using the dough hook, turn mixer on low speed. With the mixer still on, slowly add in the remaining 3 cups of flour, 1 cup at a time. Once all 6 cups are in, turn speed to medium and let the dough mix for 6-8 minutes. The dough should be nice and elastic. Be careful not to over-flour. I use all 6 cups, but typically do not need any extra. Once the dough is mixed, let it rest in the bowl for 5 minutes. Spray a large cookie sheet with non-stick spray (this is very important, trust me, I learned the hard way once when we ate bread without a bottom crust for dinner!). After the dough has rested in the bowl, dump it onto the greased cookie sheet. Take a sharp knife, spray it with non-stick spray, and cut dough into 3 equal pieces. Then let it rest again for 5 minutes. (These resting periods for the dough are important, so don't rush it!) Now shape the dough before baking: Take each section of dough and spread it out into a rectangle. No rolling pin required, just stretch and pull with your fingers. Fold one long end up over half of the dough, then fold the other half over that one. Then fold each side up over each other, then turn the loaf over so it is seam side down. Think of it as folding a letter to put into an envelope, then tuck the ends under. Use your fingers to tuck seams down underneath the loaf and shape it. Repeat with the other 2 pieces of dough. Once all 3 sections of dough are shaped cut 3 angled 1/2 inch slits onto the tops of dough. (This helps it look more impressive!) Crack the egg into a bowl and whisk with a fork until frothy. Spread the egg over the tops of each loaf, making sure to get inside the slits. Do not over coat, you just want it to add a nice shine and color. Place the loaves into the oven and let them rise for about 15 minutes (while the oven is on 170 degrees F.) Then turn oven up to 400 degrees F (while the loaves are still inside) and bake for 15-20 minutes, or until the tops are golden brown and crisp. Turn the oven down to 350 degrees F. and bake for an additional 10 minutes. Remove the loaves from the baking sheet and allow them to cool a bit before slicing them. Slice and enjoy! Adapted from Life in the Lofthouse I can't believe that it is almost August already!!! Where has this summer gone? I have to say, I am not looking forward to Miss L's first day of Kindergarten. I was so excited to have all three kids home with me for the summer, and that was when she was only going to preschool three days a week. Now with her being gone for five full days, it just feels like I won't be getting my fill of time with her. I feel as though this next month is really all I have left before she leaps into a new stage of childhood. With that being said, we have been SUPER busy the last few weeks. We have had family in visiting from California as well as preparing for an upcoming 60th wedding anniversary party for my grandparents. I have felt like my time has been very focused on accomplishing things rather than spending it with my kiddos. With that in my mind I chose to take today as a day off from all things task oriented. It was a perfect Wednesday... I had recovered from the weekend before and caught up on laundry, house work, etc. but felt like I could take a day before worrying about grocery shopping and party prep for the weekend ahead. Today was going to be my kids day. It was going to be OUR day! Before bed last night I informed my girls that there was no schedule and no rules for tomorrow. When they work up this morning, my oldest reminded me of that promise right away! She was thrilled when I simply responded, "your right, so what are we going to do?" I had decided that today my answer would be "YES", no matter what they wanted to do (with the exception of things like sky diving or anything to over the top) I would simply say "YES" and away we would go. I wasn't sure where this idea might lead us, but I thought it was worth trying and seeing what affect it had on their attitudes, my attitude, and if maybe I was missing something that they might have been wanting to do all summer and I have been to busy to listen. Here is how our day played out... 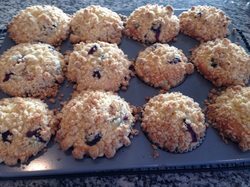 We started the morning off with fresh baked blueberry muffins. I knew I had all the ingredients, so I pulled them out and started cooking. Typically I have all my assistants lined up on stools at the counter next to me, but today they were content with playing together and allowing Momma some time alone in the kitchen. They each made a couple appearances to ask how much longer and to peak through the glass on the oven door as the muffins puffed and browned. They were delicious and we all dug in with a large glass of milk as soon as they were cool enough to eat! 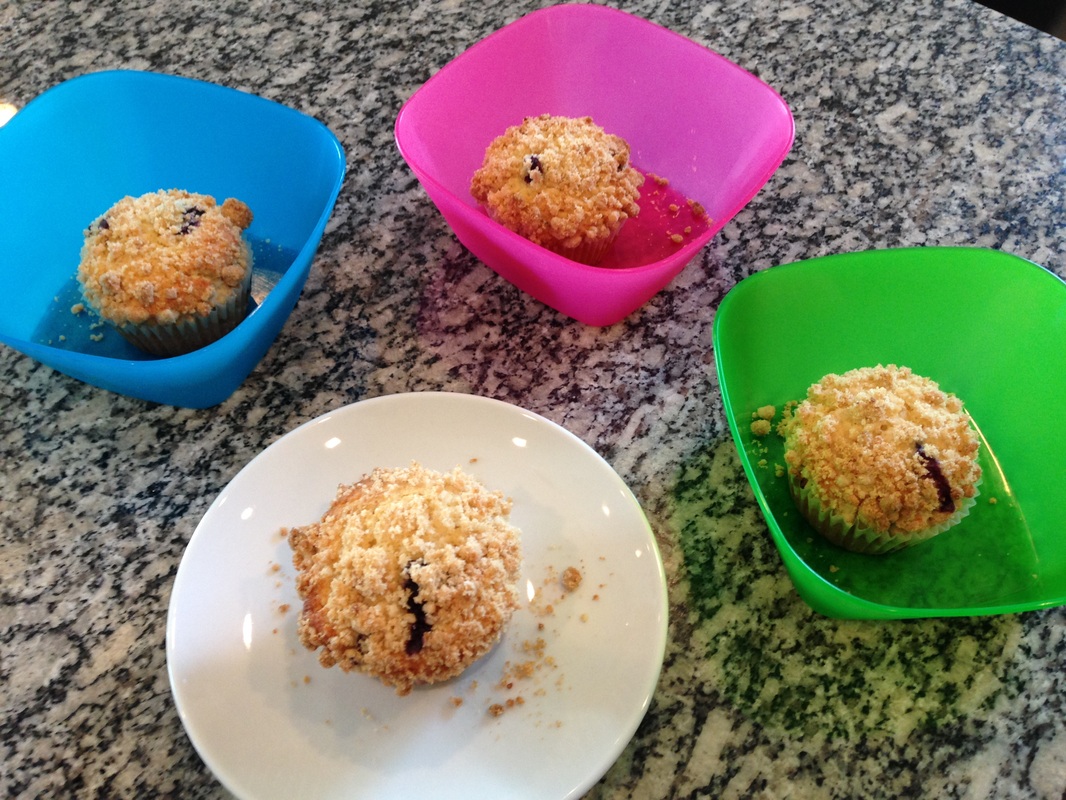 With our dishes cleaned up, the girls decided it was time to color and Mr. N was thrilled when he saw the markers appear from the pantry! We sat together coloring and giggling. Mr. N and I talked about colors as he asked for new markers every five seconds, and Lady A was excited to practice drawing lines and shapes in one of her "school" books. Miss L decided it was time to start the picture book she has been planning all summer and worked diligently to make the most beautiful rainbow she possibly could. 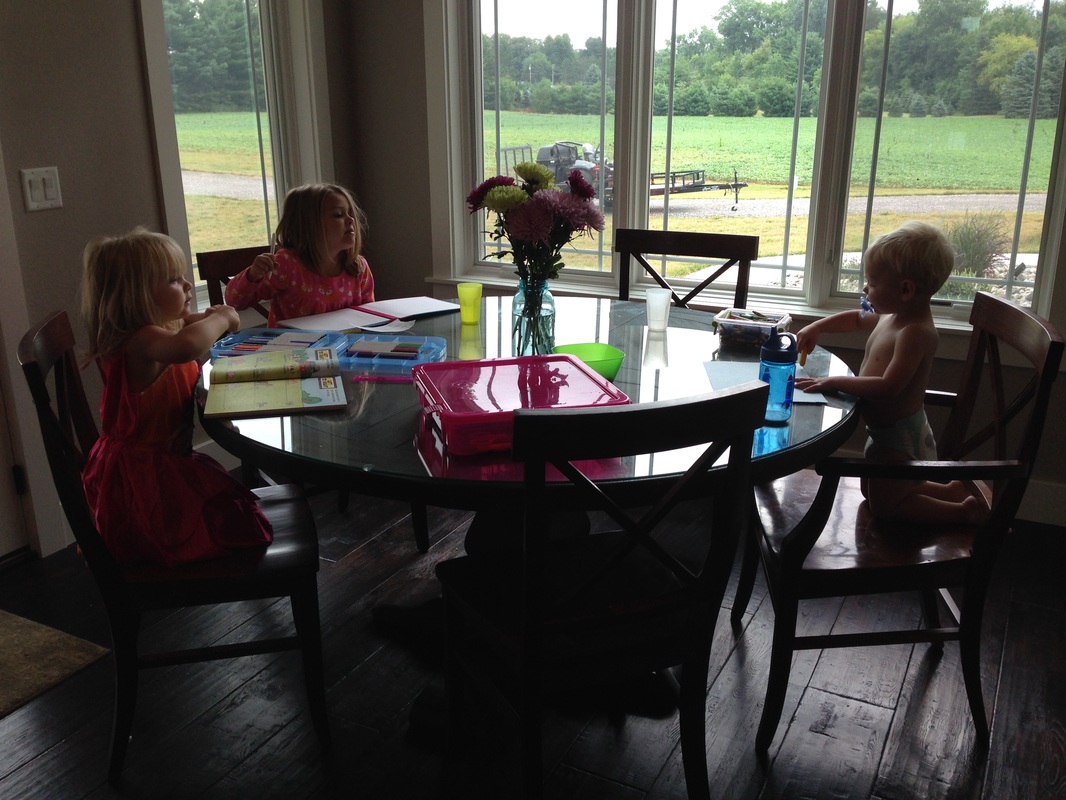 As the excitement of the coloring wore off for Mr. N I lead him into the living room and decided we would play with his blocks and tool box together. It didn't take long before I realized he was more interested in building and drilling than in playing with me, so I enjoyed sitting back and watching. Next thing I knew the girls were crowded around and thought that his toys seemed pretty neat. Eventually, the girls began using the blocks to build a castle, and Mr. N just kept hammering and drilling away. I was amazed as I watched him at how he knew to use the tools already. The hammer hits. The screwdriver turns. He was engaged for a good 45 minutes. Does he do this often? Was it a new combination of toys that he had never had out together before? Why is it that I often just notice him playing with his tools when I hear him hammering my furniture and I tell him to stop? I sat on the couch watching my kids play and realized that I had time to flip through a magazine that had been sitting on the table for a month. I simply sat in the room with them, watched them play and enjoy each other, and I took a little time for myself as well. It was amazing. It was something I do not do enough. It was satisfying for all of us. 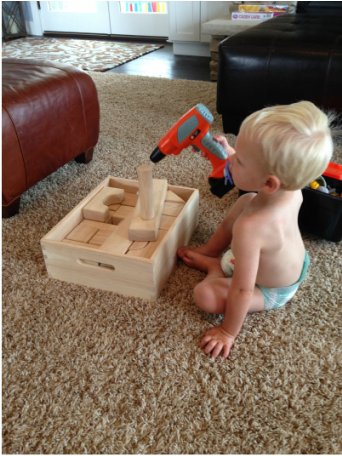 Lady A decided it was time for a game. She pulled out our Bubble Guppies board game from the cabinet and asked if I wanted to play. "YES" was my answer of course, and we began to set the game up. As we located all of the pieced Mr. N came running to me grabbing his diaper and saying "poop poop"... up until this point, we have not been trying to potty train, but when your almost 2 year old makes such an announcement, my gut told me to go with it. We quickly ran to the potty and he sat. He waited, and the girls giggled. He smiled at them and they cheered him on. I was sure nothing was going to happen, but it was "YES" day, so if he wanted to sit on the potty my answer was "YES" and so we sat. Then, all of the sudden, SUCCESS!!! I think he may have scared himself, but he was excited when I announced "YOU DID IT!!!" The girls laughed and danced and said "Good Job!" and he was thrilled with himself! If you have never potty trained a child, you may think that this is TMI, but it was truly an exciting moment and one worth remembering! Of course. once we were done on the potty it was time for a special treat to celebrate. Big sisters were even more excited when I told them they could have one too since they did such a great job encouraging him. Needless to say, he wanted to sit a couple more times throughout the day... there was no more success... but he was proud of himself, and hoped for more goodies! 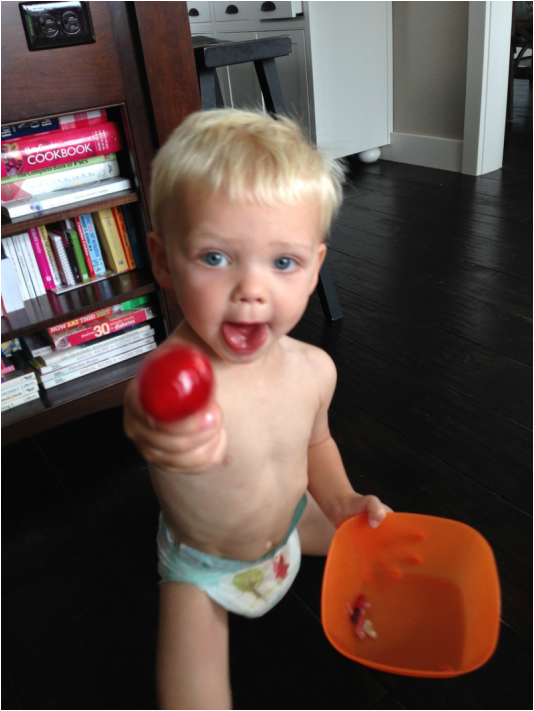 After the potty excitement we got back to our board game. We played a whole round and then put that game away and the girls decided on a game of Operation next. This time I wasn't asked to play and I enjoyed watching them giggle and play together. Again, why don't I notice these moments between them more often? Why is it I usually focus more on when they are fighting over a toy? While they played I took a moment to get cleaned up myself and much to my surprise I made it through my whole shower without interruption. I was shocked. 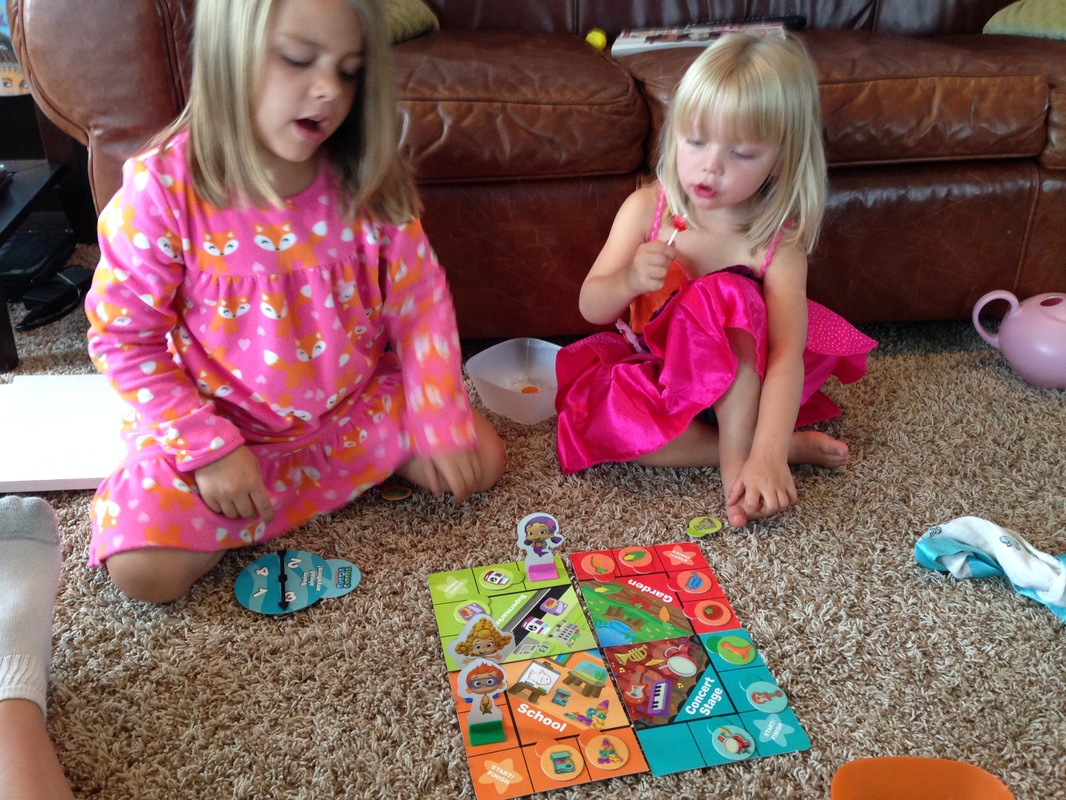 When I asked what they wanted for lunch they insisted they wanted to help cook. We headed to the kitchen and pulled left over taco items out of the fridge. But since they were so excited to actually cook something, I sliced up some zuchinni from our garden and we made zuchinni pizza bites to go with it. I knew they would enjoy using the pastry brush to brush the oil on the pieced of zuchinni and that I could have everything else warmed up and ready to go while they did that. They cooked and I microwaved the taco ingredients. By the time the zuchinni bites were done so was the rest of lunch. We sat together and talked while they ate and before I knew it, it was nap time. Such a wonderful morning. I was surprised when it was time for naps already! Why is it that some days the hours seem to crawl by?
After lunch the kids happily went down for naps. Mr. N took a wonderful three and a half hour nap and the girls did a great job having their quiet rest time watching a movie in my bed. Lady A even zonked out for a bit. When the girls woke up, they decided they wanted to do some of their "school" books, so we practiced writing our names, drawing shapes, following directions, and reading a few sight words. It was a wonderful way to spend some very simple time.
I learned that I allow myself to be to busy. By saying "YES" to them, I am really also saying "YES" to myself. I got to enjoy them and be truly present to them today. I was proud of the amazing little people I spent my day with. When I first decided to have a "YES" day, I was sure they would have me running all over town to parks and playgrounds. Setting up sprinklers and eating popcicles. While I am sure they would have enjoyed those things as well, what I learned today is that what they really wanted was me. Quiet, relaxed, focused time with me. We did nothing out of the ordinary really today, I was just present and focused on them while we did it. I didn't run off to fold laundry or ask them to wait while I loaded the dishwasher. Instead, I put our time together first, and I learned that when I did that, they happily gave me time to do what I wanted/needed too. I think the day probably meant more to me than it did to them. I learned a lot. It gave me an opportunity to regain a little focus after a few weeks of to much crazy. They truly are my world, and I need to work more on blocking out some of the other distractions I let get in the way. The laundry can wait until after the board game. The dishes will still be there after we read a story. Simple, I know, but so easily forgotten! We will have more "YES" days in our future. Will you? What do you think your kids would want to do on their "YES" day? Would you tell them it was a "YES" day, or just mentally decide it for yourself and see what kind of difference it makes in every ones attitudes? I encourage you to try... you might be amazed at what you find!  Dig...Dirt...Castle...Play...Shovel...Truck...Sand...Build...Roll...Jump...Water...Run...Smash...Stomp... No matter how you do it, a sandbox is always a good time. It is a place in childhood where it is always acceptable to get messy, dig, explore and imagine. When my parents bought a small glorified fishing shack years ago, I was young and could not imagine what an impact that cottage would have on my life. Not only did we do the typical lake activities, but it was a place to bring friends and reconnect with family. It is where I got to know my now husband (then good friend of my older brothers), long before we had any romantic interest in one another. Then it became our weekend getaway and eventually provided a "vacation" with our little ones. Shortly after the arrival of their 4th grandchild, my parents quickly realized the small fishing shack was becoming to crowded and purchased a larger home on the same chain of lakes. This provided an opportunity for our family to continue to grow and for my siblings and I to offer the same friends and family opportunities to our children while enjoying the pleasures of lake life! For my husband and I, it has allowed us to disconnect from all the tasks at home and reconnect in a more focused way to our children on the weekends. While it has been a work in progress updating the new house (think orange shag carpet and LOTS and LOTS of big loud wallpaper) and uncovering the overgrown, but beautiful, yard, this summer has felt like the first of the last 4 where the work is beginning to turn into more of what do we WANT to do and less of what do we HAVE to do. The first kid focused project of the summer was our lemonade stand and this past weekend my dad and hubby built the kids a HUGE sandbox! The goal was for all 7 grand kids (and lets be honest, Papa too) to fit inside and have room to play together. I think they did a wonderful job! The day started with my dad and husband loading up our three kids and heading to the lumber yard! Typically, this would mean I would find a big cup of coffee and a magazine to read leisurely on the couch, but instead Mimi (my mom) and I headed into town as well, on a hunt for new and exciting sand toys. After going to Family Dollar, Shopko, and CVS, we headed home with new items sure to please the kiddos. When we arrived they were unloading the wood and getting right to work. The sand box is 10' x 10' so they bought 4 10-foot boards and quickly screwed them together. Then came the time to get out the tractor and go get the sand. We are lucky to have sandy soil on one area of the property which we discovered while digging a burn pit one weekend. Since a sandbox of this size requires a lot of sand, we were excited to be able to simply scoop it out of the yard! My hubby started up the tractor and scooped up 7 large buckets full of the awesome sand and dumped them into the awaiting sandbox. Once the sand was spread out and raked through to be sure it didn't have sticks etc mixed in, the kids jumped right in (and so did Papa) and were thrilled when Mimi brought out the new toys. They played and played, only stopping for a quick picnic lunch. The next day was more of the same. This time I was able to convince them to put their bathing suits on first so they could get as messy as they wanted and the clean up was much easier on mom! They quickly got creative and included a sprinkler which became a source of water for mud (sand) soup as well as a great way to create puddles to jump in when you did an obstacle course which ended with rolling in the sand. We left one bucket full of dirt as a mound in the middle of the sandbox which the kids enjoyed rolling and sliding down. Then, while the men continued to do a little landscaping, Miss L ran over and stole a large branch they had trimmed off a tree. She quickly brought it back and stuck it into the mound of sand. Before I knew it she had grabbed a small lawn chair and placed it in the sandbox. She was thrilled with the "beach" she had created, and I have to say I was impressed with her creativity! This project was an inexpensive way to create an environment where my kids can just be kids. They can get dirty, imagine, create and explore. I thoroughly enjoyed my time watching them from my lawn chair as I soaked up a little sun and sipped my ice tea. This project was a win win for both the kids in the family as well as the adults! 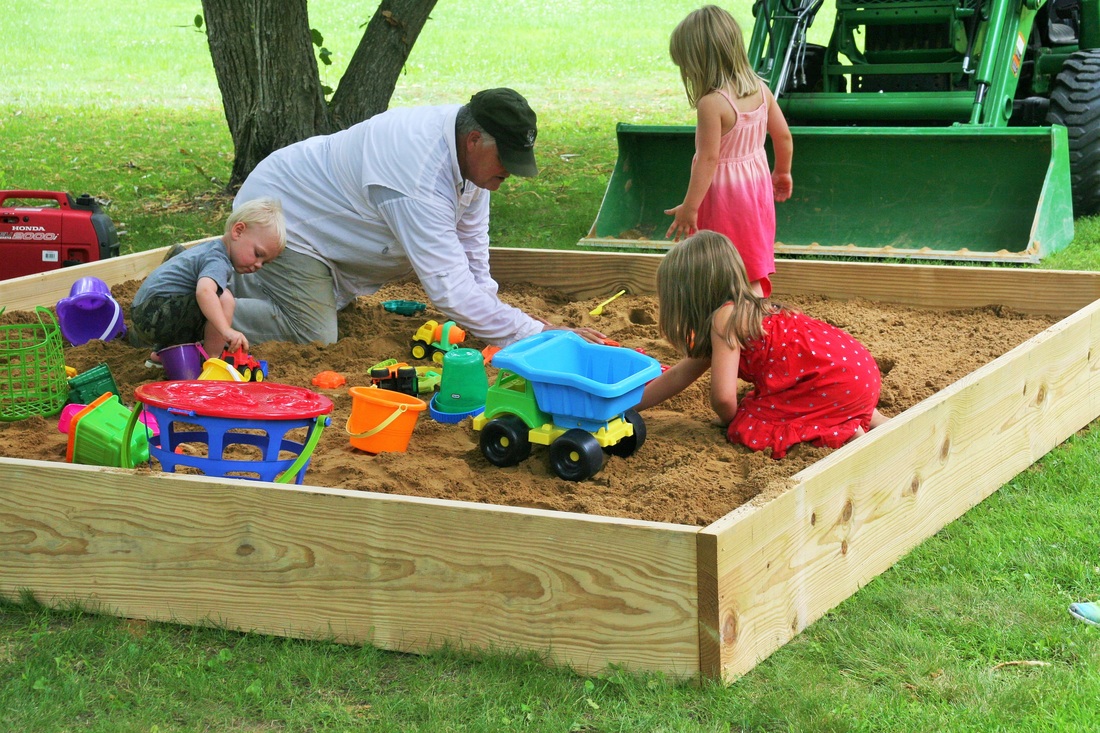 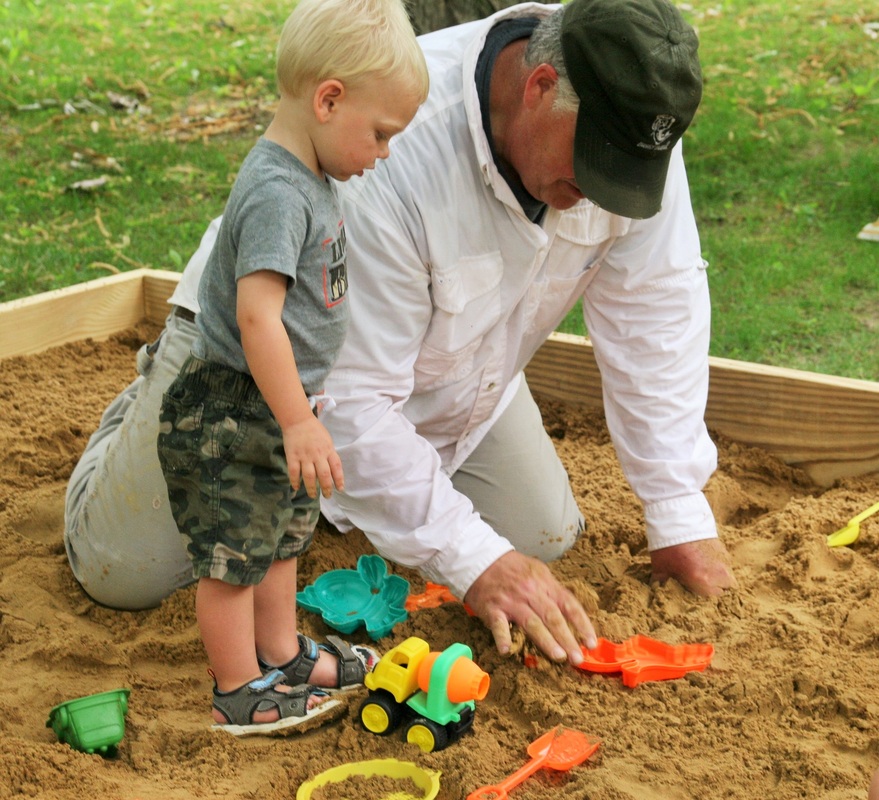 Who do you think was more into it... Papa or Mr. N? 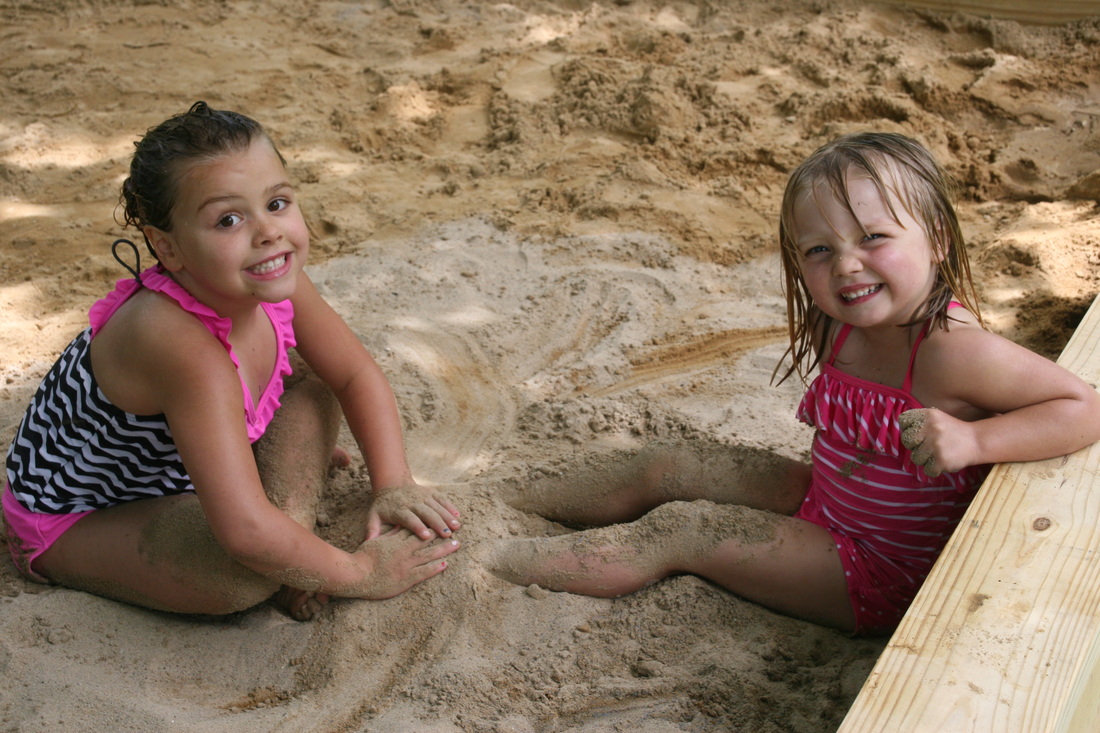 They truly are best friends... makes a Momma proud! 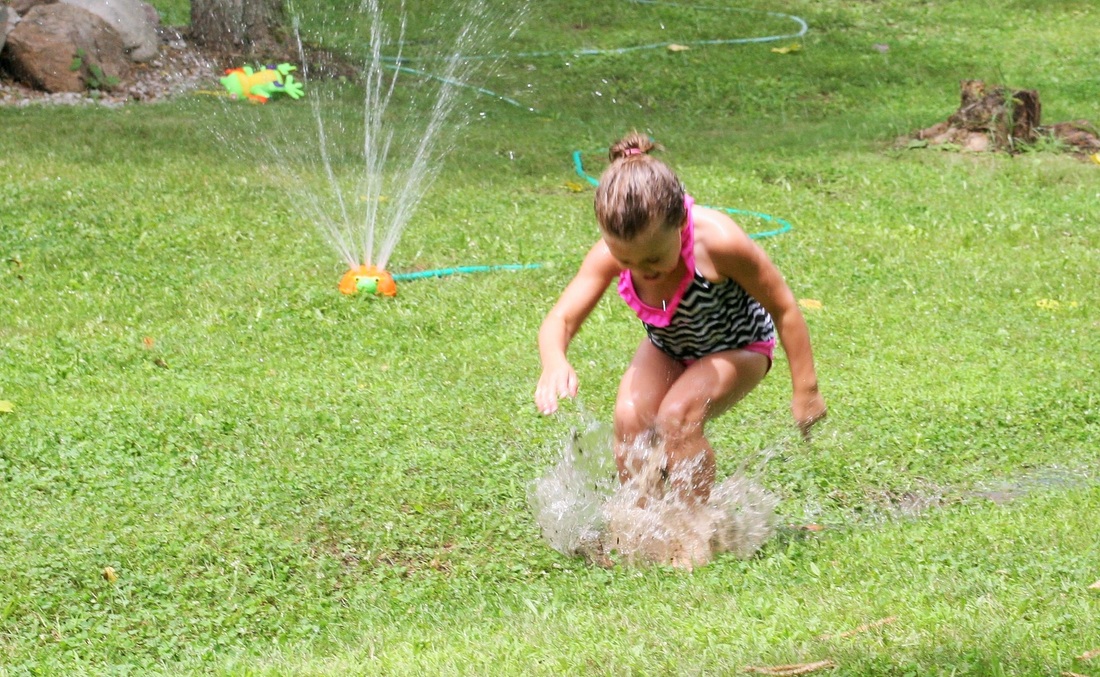 SPLASH! 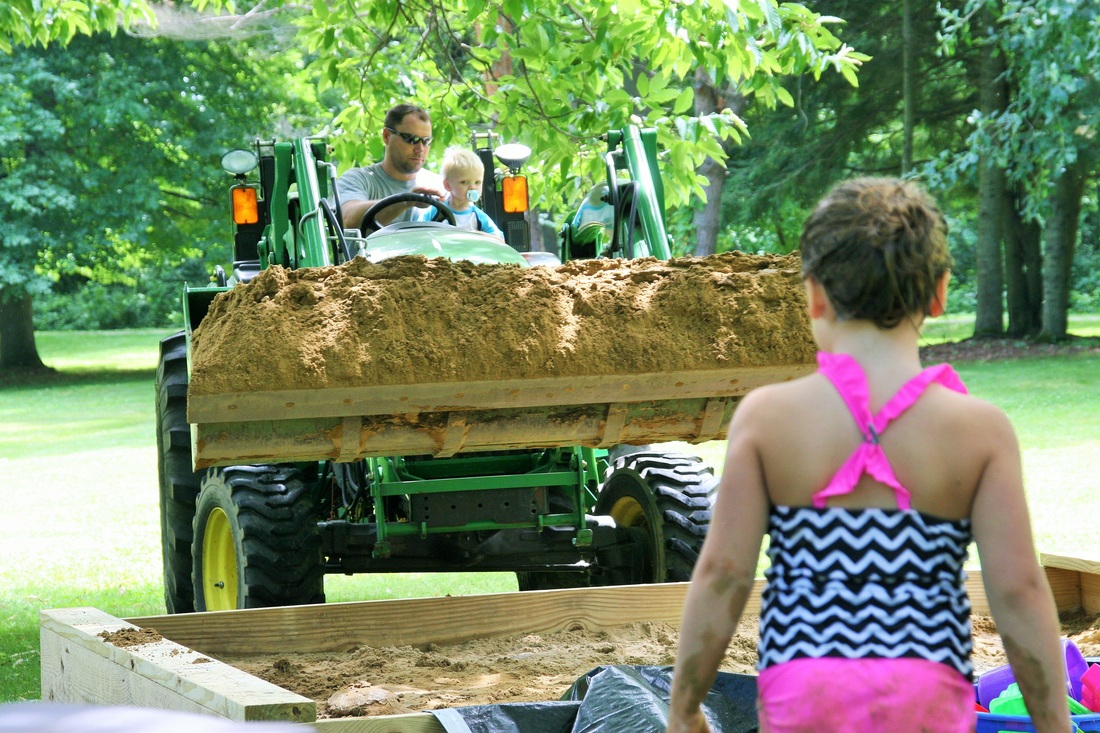 Mr. N was pretty excited about helping drive the tractor and dump the sand! 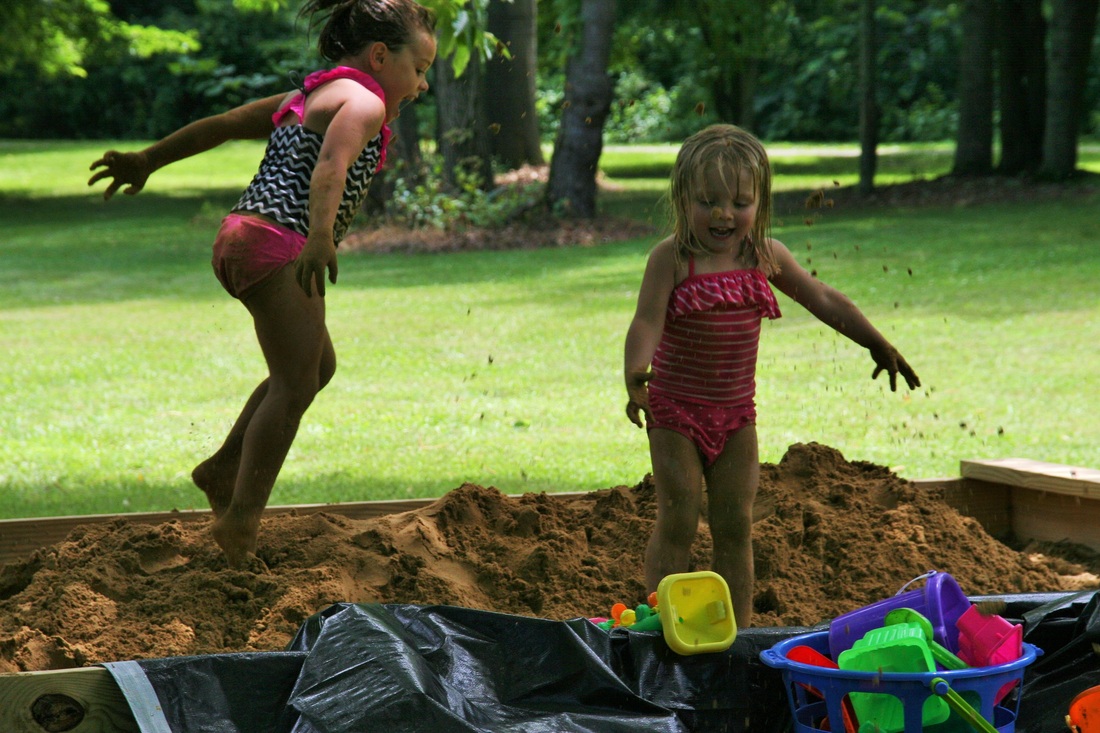 I will admit... I had to bite my tongue very hard at times when I started to let myself think about just how messy they were getting... but I did it and they are all the better for it! 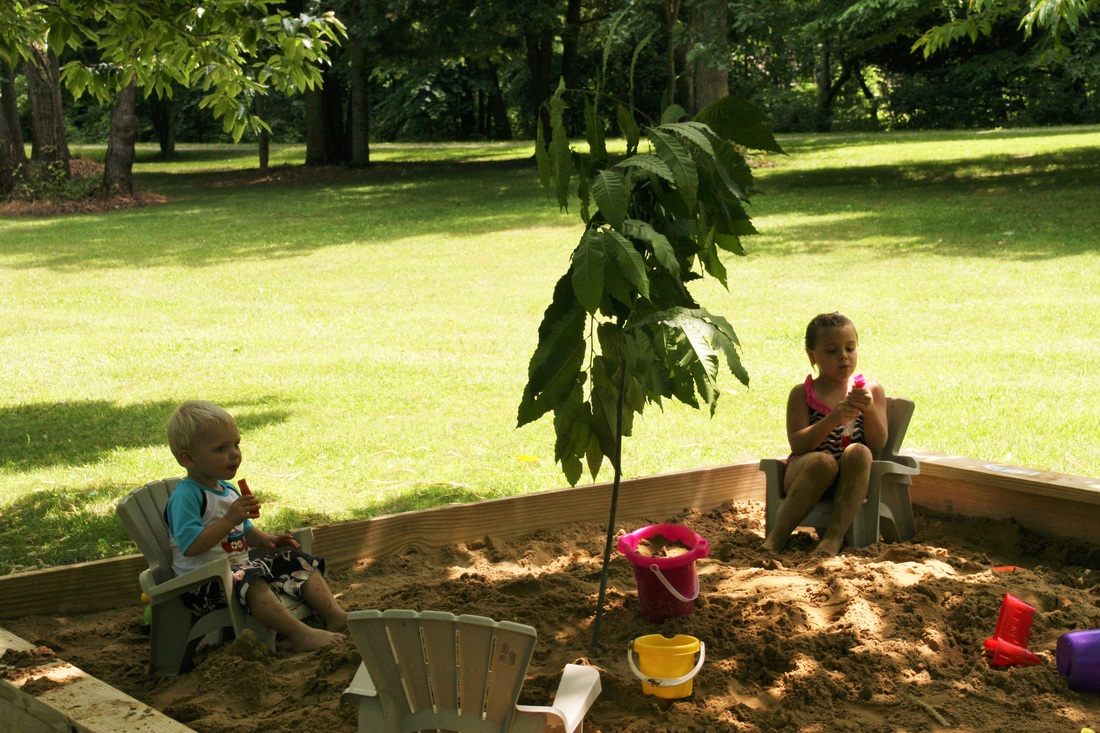 What better day to relax on a warm day than with a popcicle at the beach!? Do you have a sandbox? Did you growing up? What are some of the best sandbox toys? What creative sandbox activities can you share?
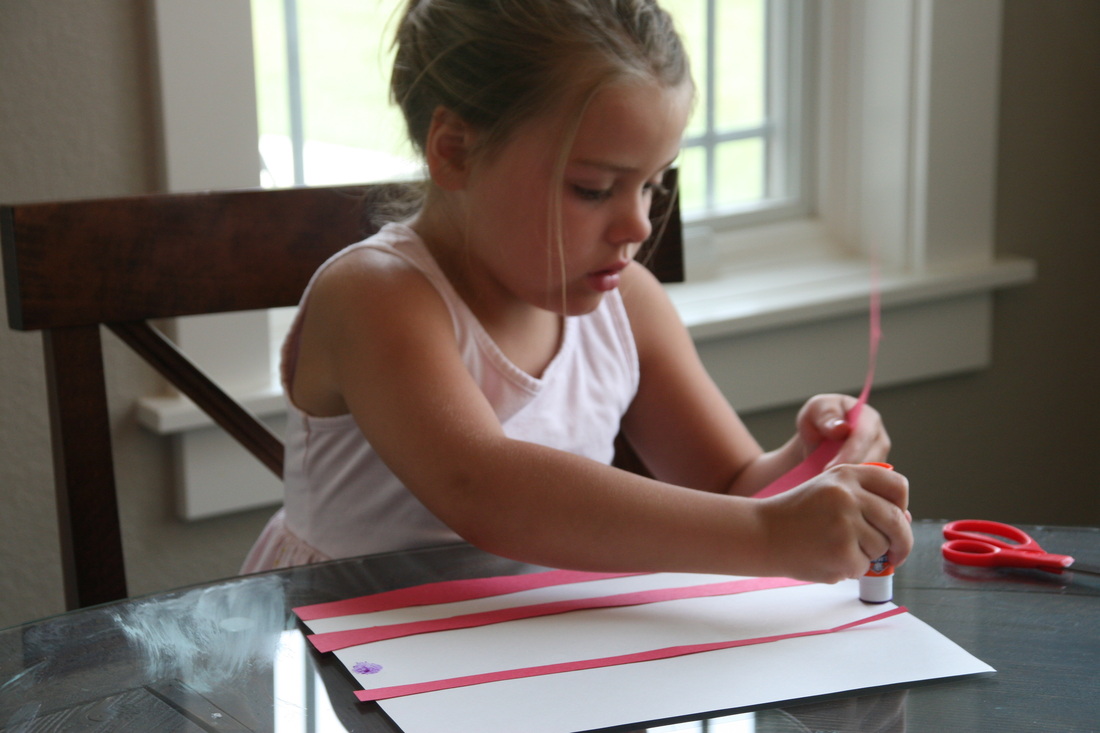
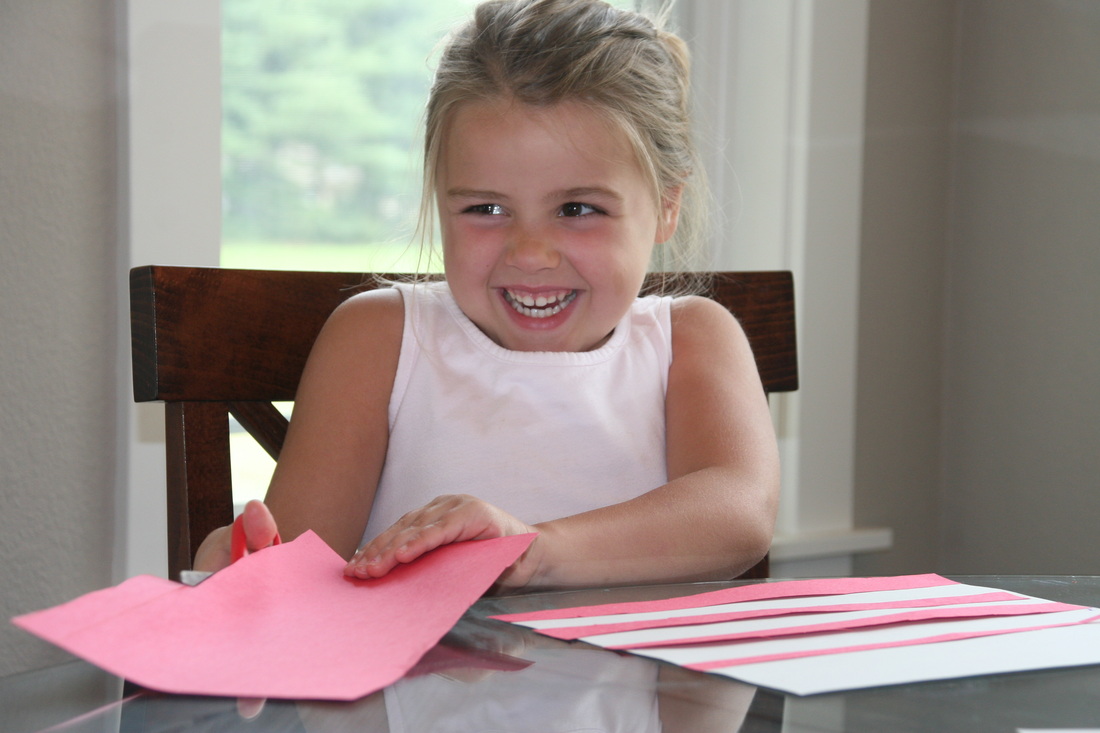
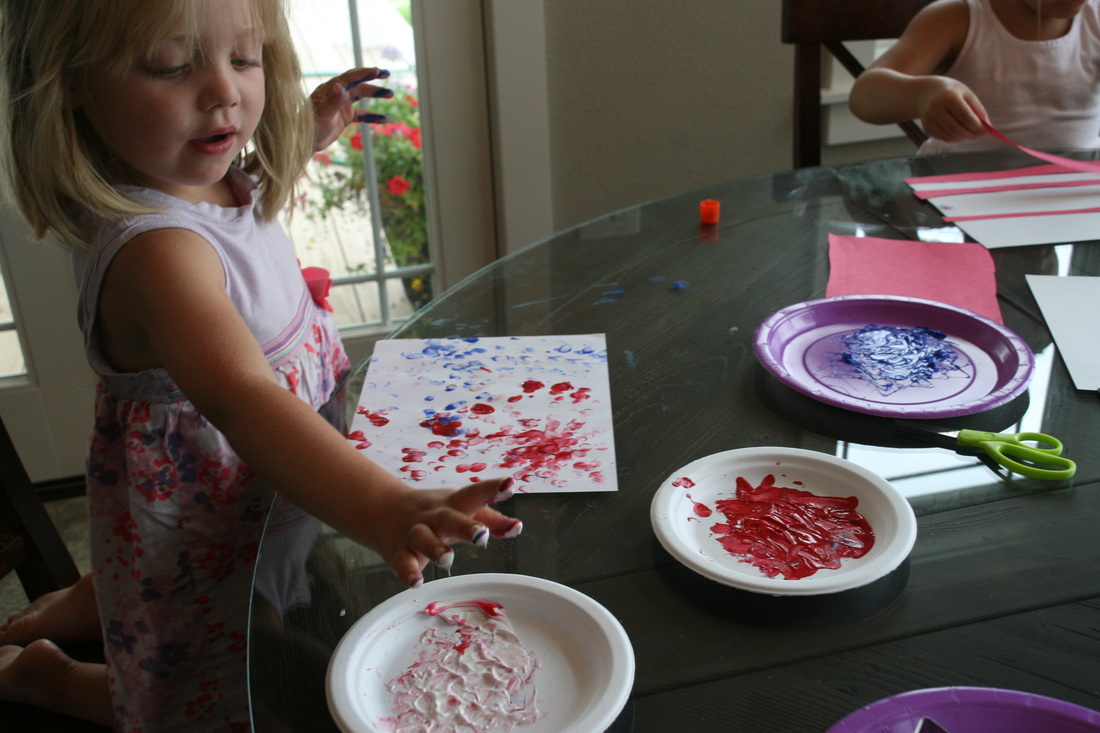
 I find holidays to be great inspiration for activities to do with my kids. There are many days when I am trying to think of something to do with the kids that I run into mental road blocks and I struggle to come up with an idea of something that seems unique or interesting. Holidays however, seem to provide great inspiration and a distraction from the daily routine. I am a big believer in celebrating anything, simply for the sake of having a celebration. When we celebrate things we tend to be more thankful, surround ourselves with family and friends, and there is most definitely yummy food involved! With 4th of July coming this weekend, I knew I wanted to do some activities with the kids to get them in the spirit, and provide me with an opportunity to explain just how blessed we are to live in America! I had a couple of ideas in my head of activities we could do. I wanted to do something related to the flag, fireworks, and stars. With a busy week ahead getting ready for family gatherings, I knew today was my only chance. I rounded up what I could come up with around the house, and got a big reminder that sometimes keeping things simple is the best answer! I was surprised at how creative my kids were when I simply let them do what they wanted with only minimal guidance! 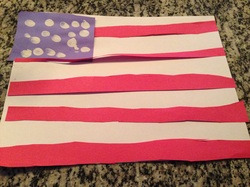 For our flag craft I wanted to have the kids use red, white and blue construction paper to make a flag. I knew this would give them an opportunity to cut, glue, and finger paint. I discovered that this was an activity my oldest daughter (5 years old) was all about. She quickly started cutting her strips of red paper, but ran into a problem. It was difficult to cut the paper in straight lines when a line wasn't drawn on the page for her. So, after she got a little frustrated with her "crooked" stripe, we did a little problem solving and I guided her to the idea of having me draw straight lines that she could cut along. This worked perfectly and she was proud of herself for "doing it on her own". Often times, especially with 3 kids all needing help with something at the same time, our instinct as parents is to swoop in and fix the problem. It would have been quicker for me to simply cut the stripes out of the paper for her, but then she wouldn't have had the fine motor practice of using the scissors, practiced her problem solving skills, or had the same sense of pride in the end. Don't get me wrong, I am not supermom, I often do swoop in and sold the problem, but I do find that when I mentally set aside time for activities like this with my kids, I am more likely to slow down and focus on what they are getting out of it than I would be if I were trying to have the do the craft while I made dinner, folded laundry and picked up toys. Even if it is only once a week that you are able to find time to really FOCUS on what your kids need, are capable of, and genuinely experience something with them, it will be so worth it for not only them, but for you as a parent too! Once she had her stripes cut out, I handed her a glue stick and told her to make a pattern with the stripes of red, white, red, white, etc. Then I once again drew lines on a blue piece of paper for her and she cut out a rectangle to glue in the top left corner of her flag. Finally, she used white paint and her fingers to paint the stars on the blue. Very simply, very few supplies, but lots of fun and learning.
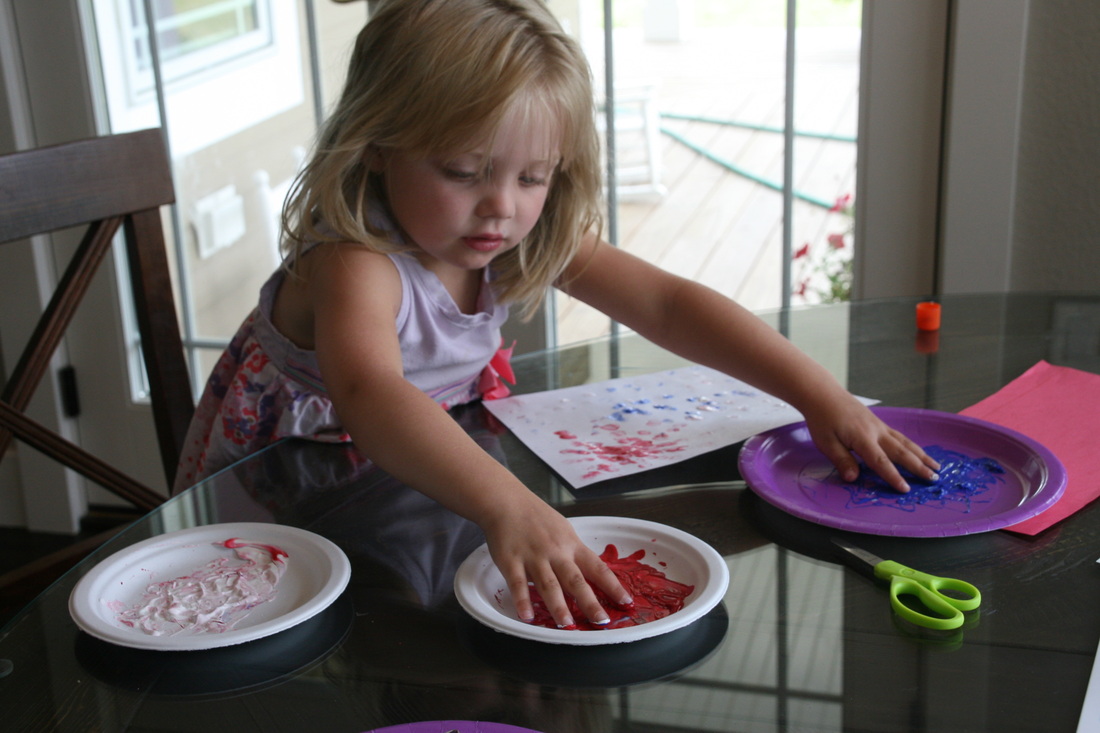
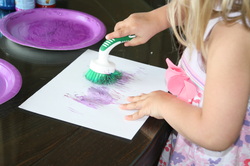 Lady A was much more interested in our fireworks craft. I had seen an idea on Pinterest using a dish brush to paint fireworks. This didn't work so well for us. We used a couple different kinds of paint, but the paint didn't come out very evenly and my kids tendancy was to rub the brush around which really just made big blobs. So instead we tried using forks to paint fireworks. While I found this to be fun, the girls found it to be frustrating. For Lady A it didn't go fast enough, and for Miss L, it didn't look enough like a firework. So, finally Lady A decided it made more sense to just use her fingers (lets be honest she just wanted to stick her fingers in the paint) but we found that using our fingers was really kinda a neat way to make dots that came out from a central point, looking, KINDA, like fireworks. It was also very fun to watch the paint colors mix together and overlap. For Lady A this was more a sensory activity than an art project, but that was just fine by me. By the end of our craft time, she was having me paint the stripes for the flag on her hand and doing hand prints on blue paper. I thought this was a pretty creative idea for a 3 year old who was watching her sister make a flag. She found a way to take what she had, what she knew how to do, and turn it into something she felt was comparable to her big sisters craft. And once Miss L saw how much fun her little sister was having, she was excited to finger paint too!
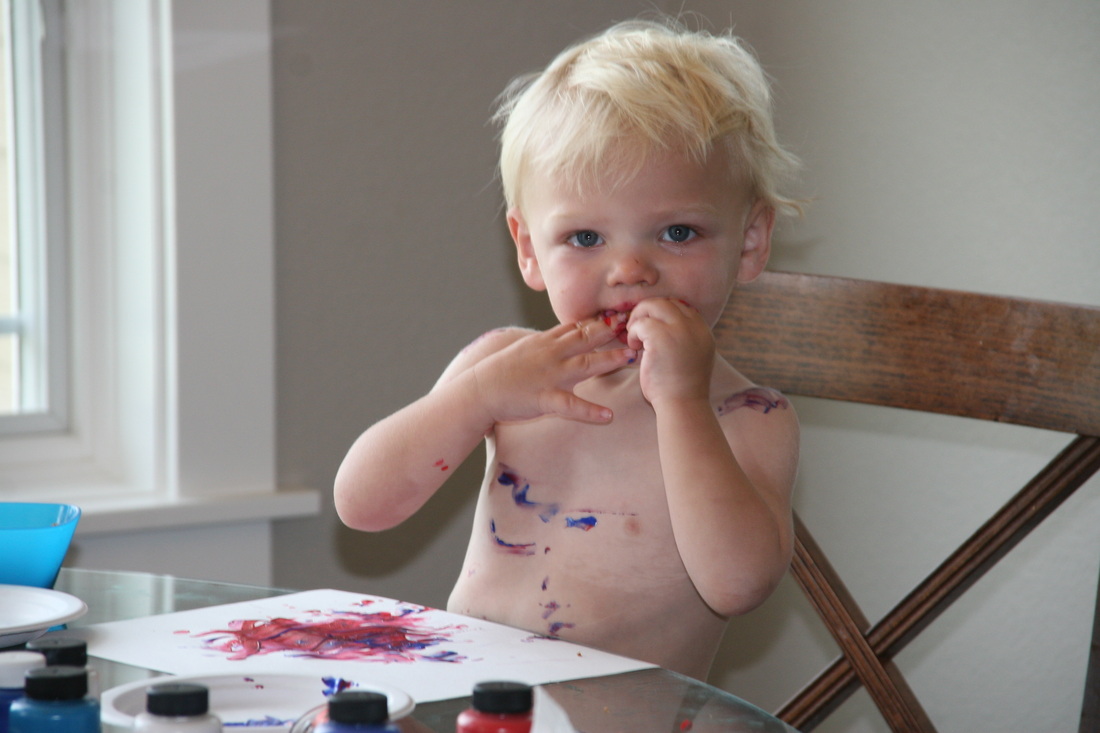
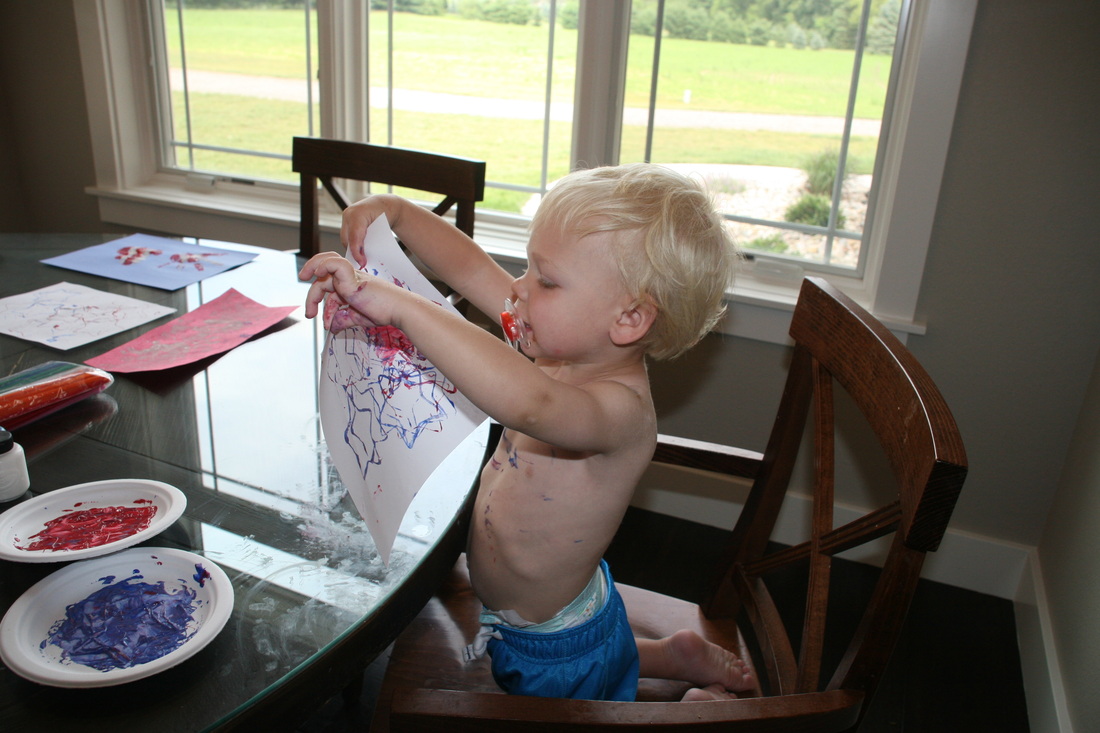
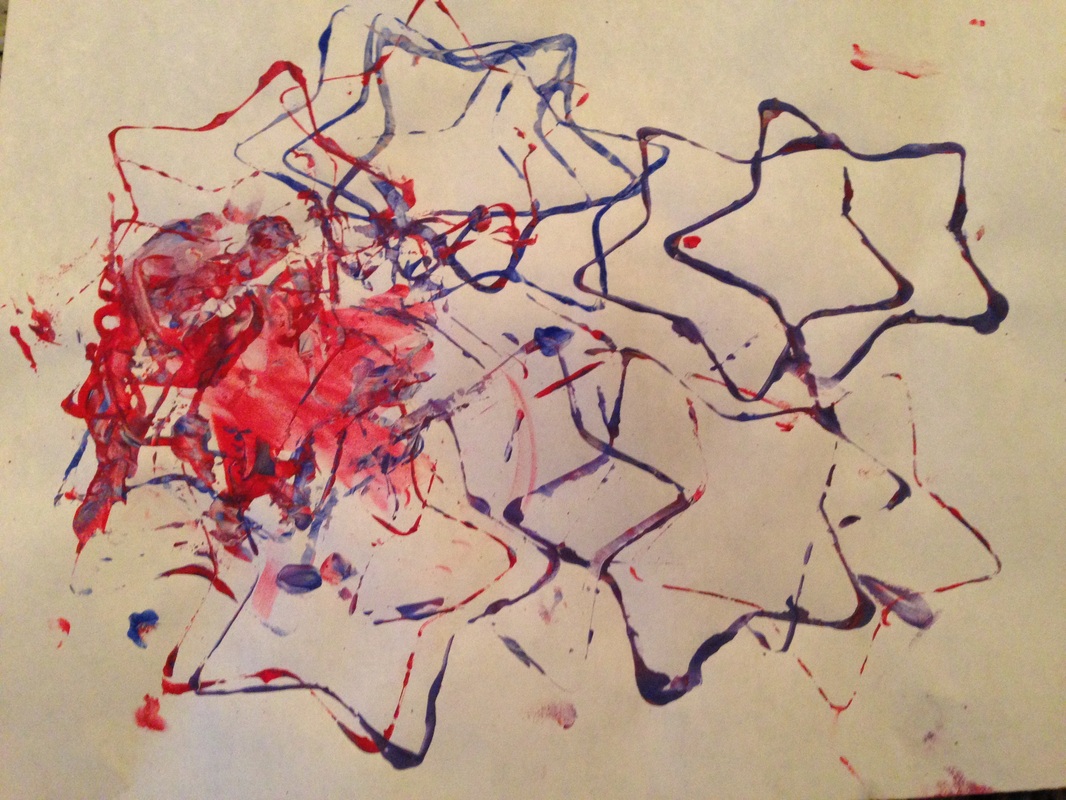
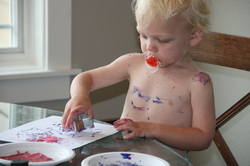 The last thing we did was use the paints and a star cookie cutter to make some overlapping star pictures. This was again lots of fun as we watched the colors mix together. The kids enjoyed being able to do it all on their own, and I was a little surprised when Mr. N picked this as his favorite activity. I thought finger painting and just playing around would be right up his alley, but I think he wasn't real sure about getting so messy. Once I handed him the star, he seemed to be more excited about going back and forth between the paper plate full of paint and the paper. Each time he pressed the star down, he squealed excitedly like he was surprised when a star appeared on his paper. He would press over and over until the paint ran out and happily rub it around on the plate again. This kept his attention for longer than I had anticipated, so it was a winner in my book!
One of the things I liked best about doing these crafts was that it gave me a natural way to talk about America with my kids. Miss L was excited to remember things like the colors on our flag and the name of our country, which she learned this past year in preschool. I had a chance to discuss what a symbol is and symbols that represent our country, such as the flag. We talked about fireworks and how to be safe around fireworks or sparklers (always a good thing to review prior to any 4th of July celebrations). I also explained what freedom is and why we are lucky to get to live the kind of life we do in our country. I want my children to understand and be grateful for all the opportunities they have in their lives. I shared a little about my Grandfather who was a soldier in World War 2 and how if it weren't for our service men and woman we wouldn't get to have all the amazing opportunities we so easily take for granted. The conversation may have been simple, but it was important. I want them to grow up understanding WHAT we are celebrating and learning to count their blessings. And for me, I am always amazed at how differently I look at things now that I am a mother. By helping them learn and understand, I truly develop a better understanding myself and find that I live with a more grateful heart. This 4th of July I am grateful not only for my freedom, but more importantly for my opportunities and those that lay ahead for my children. I pray for our country and its leaders and for those who are not fortunate enough to live in the United States of America. I remember my Grandfather and all those who have, and still do fight to protect my rights. And I will celebrate by gathering with family, snuggling my babies and watching beautiful fireworks. I will be grateful and mindful of what a blessing and gift that is.
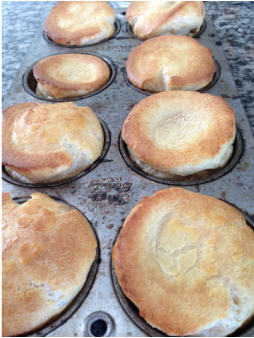
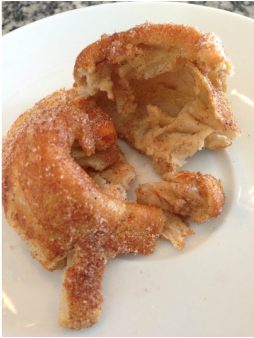
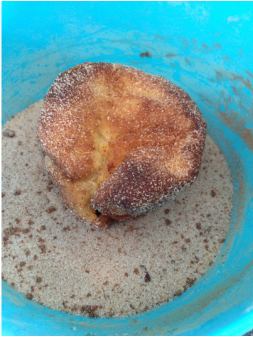
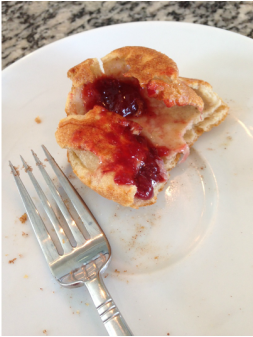
 There comes a time in the day, usually around 2:30 in the afternoon, when I crave something sweet! It is around this time that my kiddos are waking up from their naps (or whining because they boycotted their nap that day) and they need a little something to help improve their attitudes or perk them up before we move onto whatever the afternoon or evening has in store. This recipe is the perfect solution! I love it because it is easy, quick, and has minimal clean up! (This is also about the time of day when I realize the house has somehow exploded around us throughout the day and I go into recovery mode to pick it up before my hubby gets home from work and asked the dreaded question "so.... what exactly did you DO all day today?!) I love that before I even put these sweet popovers in the oven the clean up is 95% finished! This recipe requires a few simple ingredients, a few dishes, and only a bit of preparation. Not only is it simple, it will leave your house smelling AMAZING and leave guests thinking you have been cooking all day! These delicious treats are a cross between an elephant ear and a crepe. I could make a batch and spread anything from honey to nutella, cream cheese to jam on them. I love them prepared rolled in the cinnamon sugar, but the dough recipe easily lends itself to many options! I highly encourage you to give this one a try... maybe even right now! A few pointers... for starters, I used a muffin tin and not a popover tin. I don't own a popover tin, but it will be making its way onto my Christmas list! I am assuming this is the reason that the time required for my popovers to bake was much shorter. My popovers were puffed, browned and dry to the touch after the initial 15 minutes, so keep an eye on them! Also, be sure to use enough vegetable oil when greasing your pan...you don't want these beauties to deflate because you have to scrap them out of the pan! They should slide out easily when you flip over the pan. When I found this recipe on Pinterest, and read the write up at Fork vs. Spoon, I knew it was one I would be trying right away and now it will be one that I repeat time and time again! Enjoy!
Cinnamon Sugar Popovers
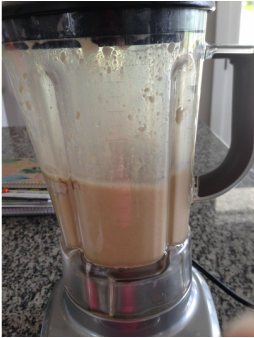
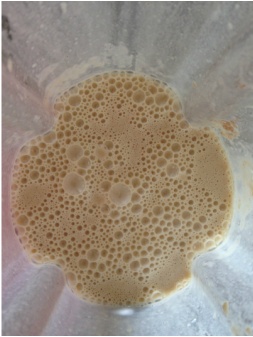
Ingredients: Popovers- 1 Cup Whole Milk 2 Large Eggs 1 Tbsp Unsalted Butter, melted and cooled 1 Cup Flour 1/2 tsp Ground Cinnamon pinch of salt 1/2 tsp Vanilla Extract 1-2 Tbsp Vegetable Oil Coating- 4 Tbsp Unsalted Butter, melted 1/2 Cup Sugar 1 1/2 tsp Ground Cinnamon Directions: 1. In a blender, combine milk, eggs and melted butter (cooled). Blend until combined. 2. Add to the blender the flour, cinnamon, salt and vanilla. Blend until smooth and frothy. (I recommend stopping and scraping the sides to make sure all the flour is mixed in) 3. Preheat the oven to 450F. Prehead the oven after you have made the mix in the blender. This will allow the flour time to absorb the liquid. (this is also a great time to mix up your coating and clean up any dishes you no longer need) 4. Combine 1/2 cup sugar and 1 1/2 tsp. cinnamon in a bowl and set aside. 5. Once the oven is preheated, place the muffin tin or popover tin in the oven for 2 minutes to heat. Remove the tin from the oven and brush with the vegetable oil to prevent the popovers from sticking. 6. Blend the mixture once more just to combine again. Pour the batter into each cup, filling about 1/2 way up. 7. Place in preheated oven and bake for 15 minutes. DO NOT OPEN THE OVEN DURING THIS TIME! 8. Reduce oven temperature to 350F and continue to bake for 15 minutes, or until they are golden brown and dry to the touch (you can open the oven during this time. 9. Remove from oven and empty onto a wire cooling rack. Use a sharp knife to poke a hole in the bottom of each popover to release the steam. 10. Allow to cool just enough to handle. Brush with melted butter and roll in cinnamon sugar mixture. 11. Enjoy immediately!! They can be rewarmed in a 350F oven for about 5-8 minutes. |

Welcome to our Farmhouse!Having three beautiful children and one handsome husband to share this farmhouse with provides me with some amazing views. From inside to out, our home provides us with magical moments as we explore all life has to offer us! I hope our moments inspire you to create and enjoy some of your own! Archives
June 2023
Categories
All
|

 RSS Feed